Detecting Similar Security Alerts at Expel
Written by Dan Whalen and Peter Silberman for the Expel blog. Reposted with permission.
Since the beginning of our journey here at Expel, we’ve invested in creating processes and tech that set us up for success as we grow – meaning we keep our analysts engaged (and help them avoid burnout as best we can) while maintaining the level of service our customers have come to expect from us.
One of the features we recently built and released helps us do all of this: Alert Similarity. Why did we build it and how does it benefit our analysts and customers?
Here’s a detailed look at how we approached the creation of Alert Similarity. If you’re interested in trying to develop a similar feature for your own security operations center (SOC), or learning about how to bring research to production, then read on for tips and advice.
Getting started
In our experience, it’s best to kick off with some research and experimentation – this is an easy way to get going and start identifying low-hanging fruit, as well as to find opportunities to make an impact without it being a massive undertaking.
We began our Alert Similarity journey by using one of our favorite research tools: a Jupyter notebook. The first task was to validate our hypothesis: we had a strong suspicion that new security alerts are similar to others we’ve seen in the past.

To test the theory, we designed an experiment in a Jupyter notebook where we:
- Gathered a representative sample set of alerts;
- Created vector embeddings for these alerts;
- Generated an n:n similarity matrix comparing all alerts; and
- Examined the results to see if our hypothesis held up.
We then gathered a sample of alerts over a few months (approximately 40,000 in total). This was a relatively easy task, as our platform stores security alerts and we have simple mechanisms in place to retrieve them regularly.
Next, we needed to decide how to create vector embeddings. For the purposes of testing our hypothesis, we decided we didn’t need to spend a ton of time perfecting how we did it. If you’re familiar with generating embeddings, you’ll know this usually turns into a never-ending process of improvement. To start, we just needed a baseline to measure our efforts against. To that end, we chose MinHash as a quick and easy way to turn our selected alerts into vector embeddings.
What is MinHash and how does it work?
MinHash is an efficient way to approximate the Jaccard Index between documents. The basic principle is that the more data shared between two documents, the more similar they are. Makes sense, right?
Calculating the true Jaccard index between two documents is a simple process that looks like this:
Jaccard Index = (Intersection of tokens between both documents) / (Union of tokens between both documents)
For example, if we have two documents:
- The lazy dog jumped over the quick brown fox
- The quick hare jumped over the lazy dog
We could calculate the Jaccard index like this:
(the, dog, jumped, over, quick) / (the, lazy, dog, jumped, over, quick, brown, fox, hare)
→ 5 / 6
→ 0.8333
This is simple and intuitive, but at scale it presents a problem: You have to store all tokens for all documents to calculate this distance metric. In order to calculate the result, you inevitably end up using lots of storage space, memory, and CPU.
That’s where MinHash comes in. It solves the problem by approximating Jaccard similarity, yet only requires that you store a vector embedding of length K for each document. The larger K, the more accurate your approximation will be.
By transforming our input documents (alerts) into MinHash vector embeddings, we’re able to efficiently store and query against millions of alerts. This approach allows us to take any alert and ask, “What other alerts look similar to this one?” Similar documents are likely good candidates for further inspection.
Validating our hypothesis
Once we settled on our vectorization approach (thanks, MinHash!), we tested our hypothesis. By calculating the similarity between all alerts for a specific time period, we confirmed that 5-6% of alerts had similar neighbors (Fig 1.). Taking that even further, our metrics allowed us to estimate actual time savings for our analysts (Fig 2.).


These metrics proved that we were onto something. Based on these results, we chose building an Alert Suggestion capability off the back of Alert Similarity as our first use case to target. This use case would allow us to improve efficiencies in our SOC and, in turn, enhance the level of service we provide to our customers.
Our journey to production
Step 1: Getting buy-in across the organization
Before moving full speed ahead into our project, we communicated our research idea and its potential benefits across the business. The TL;DR here? You can’t get your colleagues to buy into a new idea unless they understand it. Our R&D groups pride themselves on never creating “Tad-dah! It’s in production!” moments for Engineering or Product Management without them having the background on new projects first.
We created a presentation that outlined the opportunity and our research, and allowed Expletives (anyone from Product Management to Customer Success to Engineering) to review our proof of concept. In this case, we used a heavily documented notebook to walk viewers through what we did. We discussed our go-forward plan and made sure our peers across the organization understood the opportunity and were invested in our vision.
Step 2: Reviewing the design
Next, we created a design review document outlining a high-level design of what we wanted to build. This is a standard process at Expel and is an important part of any new project. This document doesn’t need to be a perfect representation of what you’ll end up building, nor does it need to include every last implementation detail, but it does need to give the audience an idea of the problem you’re aiming to solve and the general architectural design of the solution you’re proposing.
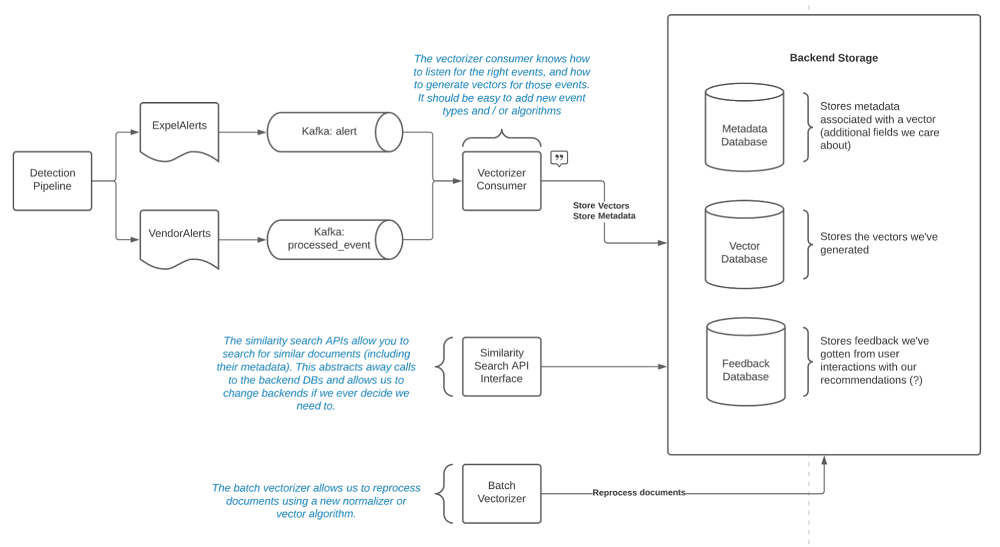
Here’s a quick look at the design we mocked up to guide our project:

As part of this planning process, we identified the following goals and let those inform our design:
- Build new similarity-powered features with little friction
- Monitor the performance and accuracy of the system
- Limit complexity wherever possible (don’t reinvent the wheel)
- Avoid making the feature availability mission critical (so we can move quickly without risk)
As a result of this planning exercise, we concluded that we needed to build the following components:
- Arnie (Artifact Normalization and Intelligent Encoding): A shared library to turn documents at Expel into vector embeddings
- Vectorizor consumer: A worker that consumes raw documents and produces vector embeddings
- Similarity API: A grpc service that provides an interface to search for similar documents
We also decided that we wouldn’t build our own vector search database and instead decided to use Pinecone.io to meet this need. This was a crucial decision that saved us a great deal of time and effort. (Remember how we said we wouldn’t reinvent the wheel?)
Why Pinecone? At this stage, we had a good sense for our technical requirements. We wanted sub-second vector search across millions of alerts, an API interface that abstracts away the complexity, and we didn’t want to have to worry about database architecture or maintenance. As we examined our options, Pinecone quicky became our preferred partner. We were really impressed by the performance we were able to achieve and how quick and easy their service was to set up and use.
Step 3: Implementing our Alert Similarity feature
We’re lucky to have an extremely talented core platform team here at Expel infrastructure capabilities we can reliably build on. Implementing our feature was as simple as using these building blocks and best practices for our use case.
Release day
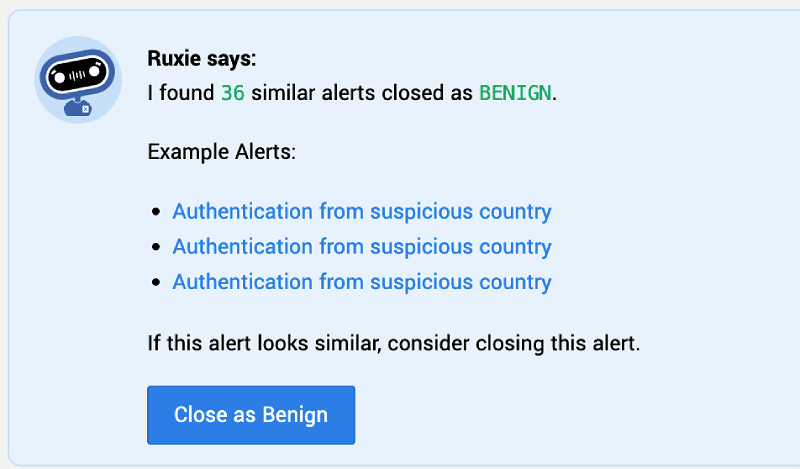
Once the system components were built and running in staging, we needed to coordinate a release in production that didn’t introduce risk into our usual business operations. Alert Suggestion would produce suggestions in Expel Workbench like this, which could inform decisions made by our SOC analysts.

However, if our feature didn’t work as expected – or worse, created incorrect suggestions – we could cause confusion or defects in our process.
To mitigate these risks when moving to production, it was important to gather metrics on the performance and accuracy of our feature before we started putting suggestions in front of our analysts. We used LaunchDarkly and Datadog to accomplish this. LaunchDarkly feature flags allowed us to deploy to production silently – meaning it runs behind the scenes and is invisible to end users. This allowed us to build a Datadog dashboard with all kinds of useful metrics like:
- How quickly we’re able to produce a suggestion
- The percentage of alerts we can create suggestions for
- How often our suggestions are correct (we did this by comparing what the analyst did with the alert versus what we suggested)
- Model performance (accuracy, recall, F1 score)
- The time it takes analysts to handle alerts with and without suggestions
To say these metrics were invaluable would be an understatement. Deploying our feature silently for a period of time allowed us to identify several bugs and correct them without having any impact on our customers. This boosted confidence in Alert Similarity before we flipped the switch. When the time came, deployment was as simple as updating a single feature flag in LaunchDarkly.
What we’ve learned so far
We launched Alert Similarity in February 2022, and throughout the building process we learned (or in many cases, reaffirmed) several important things:
Communication is key.
You can’t move an organization forward with code alone. The time we spent sharing research, reviewing design documents, and gathering feedback was crucial to the success of this project.
There’s nothing like real production data.
A silent release with feature flags and metrics allowed us to identify and fix bugs without affecting our analysts or customers. This approach also gave us data to feel confident that we were ready to release the feature. We’ll look to reuse this process in the future.
If you can’t measure it, you don’t understand it.
This whole journey from beginning to end was driven by data, allowing us to move forward based on a validated hypothesis and realistic goals versus intuition. This is how we knew our investment was worth the time and how we were able to prove the value of Alert Similarity once it was live.
What’s next?
Although we targeted suggestions powered by Alert Similarity as our first feature, we anticipate an exciting road ahead filled with additional features and use cases. We’re interested in exploring other types of documents that are crucial to our success and how similarity search could unlock new value and efficiencies.
Additionally, as we alluded to above, there’s always room for improvement when transforming documents into vector embeddings. We’re already exploring new ways to represent security alerts that improve our ability to find similar neighbors for alerts. We see a whole world of opportunities where similarity search can help us, and we’ll continue experimenting, building and sharing what we learn along the way.
Interested in more engineering tips and tricks, and ideas for building your own features to enhance your service (and make your analysts’ lives easier?) Subscribe to our blog to get the latest posts sent right to your inbox.